Saturday, April 18, 2009

Swirl Accent Wire Wrapped Bead Necklace

I made this wire wrapped necklace today! Just want to post it and share with you all. I tried a little fancier wire wraps this time. The swirls on the bead gives the necklace an interesting artistic touch! Hope you like it! :) When I get a chance, I will try
Save as Draft
to compile a tutorial for this technique.

Thursday, April 16, 2009

Simple Handmade Earring Gift Box

While looking for a new and cute way to package some of my simple earrings as gifts for my niece's birthday party, I came up with this idea of using cute little favor boxes to package earrings. It turned out to be an awesome idea for young girls. My niece packaged about 8 different pairs of earrings into these boxes (all the boxes look very similar from the outside), and gave to her friends when they came over for her birthday party. It was quite a surprise for all the girls, and they all end up loving the pair they picked!

Have you ever consider holding a simple jewelry-making party for your girl? Try it, I think it would be a lot of fun!!

Wednesday, April 15, 2009

Wire Wrapped Rings

Try this wire wrapped ring, you can use any beautiful bead you have!

Tuesday, April 14, 2009

Jewelry DIY Feed Subscription


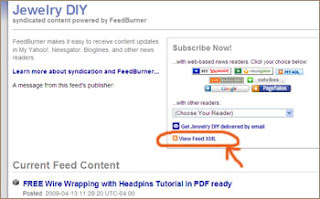
Many of you have asked me how you could more conveniently view my complete listing of jewelry tutorials, tips and ideas, and I have suggested that you subscribe to this blog's feed. Below is how you can do this.

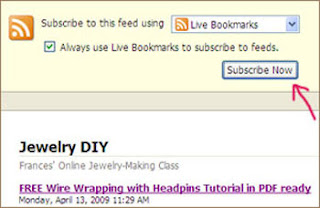
1. Click this link here, and you will see either one of the screen as shown on the right.

2. Press either the "View Feed XML" or "Subscribe Now" button. (if you scroll down on the page there, you will already be able to see all the posts and tutorials).

3. You will then see a pop up window that says "Add Live Bookmark", and just click "Add".

4. A yellow button with "Jewelry DIY" will now appear on your browser. Simply by clicking this button in the future, and you will be led to the page of my complete listing of recent posts.

Hope this helps, and THANK YOU for subscribing! :)

Bracelet 002


Level of difficulty: ♥

This is a simple bracelet I made using bead tips. Below are the tools and supplies that you will need for this bracelet.

Tools:
scissors
chain-nose pliers

Materials:

1 clasp
stringing wire
small silver round beads
12x large glass bead nuggets
6x bead caps
3x 10mm glass pearls
2x crimp beads
2x bead tips

Directions:
1. Arrange all the beads to your desired pattern.
2. You can use bead-tips to attach the stringing wire to the clasp before you start stringing the beads.

3. Add small silver round beads between all the larger beads to give the bracelet a nice accent of silver.

Monday, April 13, 2009

FREE Wire Wrapping with Headpins Tutorial in PDF ready

I have just converted my wire wrapping with headpins tutorial into PDF format. With this file, you will be able to print out a 7 pages tutorial in clear step-by-step photos and instructions. If you would like to get a free copy of this file, please read my previous post for instructions. For those of you who had already requested the file, you should be expecting to receive the file by the end of Tomorrow.

Saturday, April 11, 2009

Using Bead Tips

Have you ever wondered how to use bead tips? This is quite a handy component to incorporate into your creations!

Wednesday, April 8, 2009

Wire Wrapping Tutorial in PDF

During this coming weekend, I will be compiling my previous step-by-step wire wrapping tutorial into PDF format. If you would like to print out a hard copy of this step-by-step tutorial for quick future reference, please feel free to leave me your name and your email address in the comment below this post. Please make sure your email address is correct before you submit it, so the file will be able to reach you. All the comments here will be invisible to the public.

Tuesday, April 7, 2009

Right Angle Weave

If you want to learn how to do right angle weave, this is a great video to watch. Karla also teaches you how to make a crystal beaded bead using this technique.


Necklace 001


Level of difficulty: ♥♥♥

This is a necklace I made using wire wrapping with headpins technique. Below are the tools and supplies that you will need for this necklace.

If you are interested in making an identical necklace as shown in the picture, you may purchase the kit at my store.


Tools:
Chain-nose plier
Round-nose plier
Side Cutter

Materials:
7 x beads of one kind
6 x beads of one kind
16" metal chain
1 x clasp
2 x jump rings
13 x 1.5" ~2" headpins

Directions:
1. Before you start, line your chain flat on the table, and place the beads in the order and position that you desire them to hang on the chain. If you prefer an even look, you might want to count how many links are between each bead to make sure they are evenly spaced out.
2. Using
wire wrapping with headpins technique, add all the beads to your desired position on the chain. Remember that you need to attach your unfinished wire wrap at step 8, before you close your wrap.
3. After you have finished attaching all the beads, wrap it around your neck to see if it is your desired length. If not, cut off the excess chain from both side of your chain, so that you have equal length of empty chain on both side.
4. Attach the clasp to the chain by using jump rings.

Monday, April 6, 2009

Wire Wrapping with


Headpins


Level of difficulty: ♥♥♥
Total steps: 13

This is a very useful technique to learn. If you are new to wire-wrapping, you might find it a little challenging at first. However, do not feel discouraged after a few tries. Keep practicing, eventually you will be able to remember all the steps, and your skill will improve. This is a skill that you will find very indispensable. Feel free to leave me a comment if you have any question!


You will need these tools:

Chain-nose pliers
Round-nose pliers
Side Cutter

Wire wrapping with headpins: Step 1

You need a headpin, approximately 2 inches long, and a bead (I used a 10mm glass pearl)

Wire wrapping with headpins: Step 2

Now, string the bead unto your headpin like this.

Wire wrapping with headpins: Step 3

Use your chain-nose pliers, grab your headpin, leaving about 2-3 mm gap above your bead.