Friday, April 3, 2009
How to Knot Pearls
If you want to learn how to do pearl knotting, this is a great video to watch. Pearl knotting is an awesome technique to master if you would like to string pearls and gemstones with higher market or sentimental values.
Wednesday, April 1, 2009
Side Cutter

This is the shape of the tip of my side cutter. If possible, invest a little more on this irreplaceable tool. Depending on the thickness and hardness of the pins and wires that you use for your project, you might want to purchase different sizes of cutter for your job. Don't use a fine cutter to cut thick wires, as it will probably damage and destroy your cutter in no time! :) A good pair of cutter should be able to give you a crisp and quick cut without hurting your hand.
Round-Nose Pliers
 This is the shape of the tip of my round-nose pliers. Depends on the style of jewelry that you make, the finer the tip the more delicate of the wire work you can make. When selecting your round-nose pliers, try closing the pliers and while holding the handles, examine whether the two tips align properly. I had bought a pair of cheap round-nose pliers in the past which I found out later that they don't really align perfectly. So, make sure you check this feature before you buy it. As long as the tips align properly, even a cheap round-nose plier should be safe for purchase.
Chain-Nose Pliers
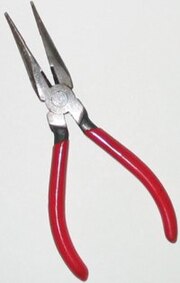
 This is the shape of the tip of my chain-nose pliers. I generally prefer the chain-nose pliers with teeth. It gives me a better grip to the wire, and makes the job a lot easier. However, flat chain-nose pliers is also available, this style becomes more essential if your design calls for thicker wires. Without the teeth, your pliers will not cause markings on your wires, and damage the look of your finished project.
My Tools
 The tools that I am using for almost all of my jewelry-making projects are shown here. These tools include a pair of good scissor, chain-nose pliers, round-nose pliers, and side cutter.
Pliers are absolutely essential in jewelry-making, and it would be especially worthwhile for you to get a good sturdy pair of pliers. If you are serious about learning this craft, do not settle for a set of pliers that seem almost too cheap to be true. During my early years of jewelry-making, I had bought some really cheap and crappy tools that seem almost useless now. In fact, I had put them away with all my other heavy-duty home-maintenance tools and pliers. Remember, if you want to make beautiful wire-work, you will need good tools to accomplish your goal.
When selecting your pliers, try holding them in your hand, and see if the handle feels comfortable in your palm. If you don't feel very comfortable holding the pliers, chances are when you are working on your project for several hours straight, your hand is going to feel very sore and tired.
One more important thing on pliers! I also prefer pliers that operate on regular springs rather than double-leaf springs. One thing I find about pliers that operate on double-leaf is that the leaf tend to lose its alignment and became quite annoying. Take a close look at the round-nose pliers that is shown in the picture above, notice the spring between the handles, try to pick a pair of pliers that operates on this kind of spring.
Tuesday, March 31, 2009
Earring Packaging
 Are you selling your earrings? How are you presenting them? I thought about a good way to package earrings by putting them in a 2" zip bags. You can staple a half folded 2"x 2" tag with names, website and contact information on top of the bag. Now your earrings can have a unified and professional look.
Do you have any other ideas? Please feel free to contribute on this thread!
Monday, March 30, 2009
Google Reader Keeps You Posted
Do you want to keep track on my new posts? This is a good video clip that I found on YouTube, it will teach you how to subscribe and get all the updated content of the sites you want to keep track, including my blog! :) A very handy tool to have! Click play to watch!
Bracelet 001
Level of difficulty: ♥♥
 This is a great handmade jewelry project for beginners. Below are the tools and supplies that you will need for this bracelet.
Tools:
Chain-nose plier
Round-nose plier
Scissor
Materials:
5 x 10mm glass pearls
5 x 8mm glass pearls
12" 2mm thick leather cord
5 x jump rings
2 x cord tips
10 x 1.5" ~2" headpins
1 x lobster claw clasp
Directions:
1. Take the leather cord, tie a simple regular knot 1.5" away from one side of the cord. Just before you tighten the knot, attach one jump ring to the loop of the card, then tighten the knot.
2. String the pearls onto the headpins, and make a loop with your round-nose plier.
3. Attache all of your pearls to the jump rings.
4. Once you finish adding all the pearls, wrap the leather cord around your wrist. Cut off excess cord so that the length of the cord is exactly your wrist size. Don't worry that this will be too tight for your wrist, because you have yet to add the end tips and the clasp.
5. Finish the bracelet by adding the end tips and the clasp, and the bracelet should be just the right size for your wrist!
Subscribe to:
Posts (Atom)